This tutorial was written by Dianna Richards of Digicats (and Dogs). Any resemblance to any other tutorial, published or unpublished, living, dead or undead, is purely coincidental.
Please do not rebroadcast, redistribute or otherwise claim this tutorial or any part there of as your own work.
Items you will need to complete this project:
The Yellow Brick Road taggers kit by Toni's Scraparoni. This kit may be purchased at Sophisti-Scraps.
Tube of choice. I am using PSP13062 Necromancy by Unholy Vault Designs. You must have a license to use this tube which may be purchased at MyPSPTube.com.
Wee Scots Lass mask #136, which you can download HERE.
Black Epoxy Alpha, which you can download HERE.
Note that H# and V# refer to Horizontal and vertical coordinates on your canvas grid. Make sure you have View, Rulers checked in order to see the ruler grid.
When I say "Add to your canvas" I expect that you will copy and paste it as a new layer, unless otherwise state in the tutorial.
This tutorial assumes you have a working knowledge of PSP. It was written using PSP X1, but should work in most other versions of PSP.
Open a new canvas 800 x 800 pxls, flood filled white.
Open YBR Paper 04. Layers --> Load/Save Mask --> Load Mask from Disk and locate Wee Scots Lass Mask # 136. Make sure the "Fit to Canvas" box is checked and the click on load.
Layers --> Merge --> Merge group. Then copy and paste Paper 04 to your main canvas.
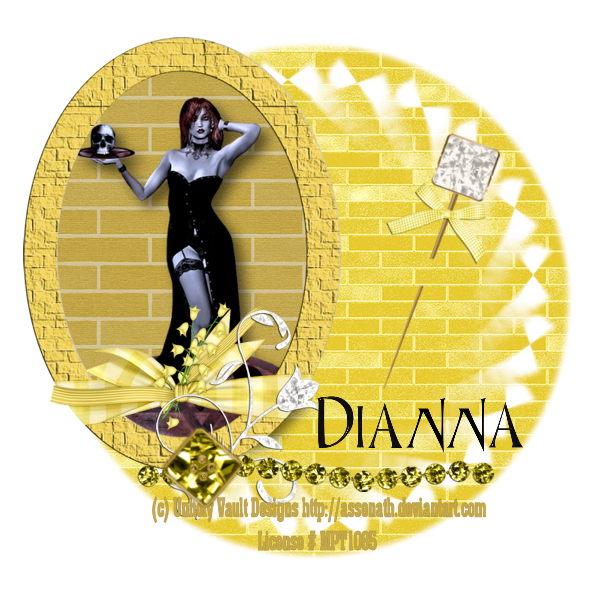
Open PSP13062 Necromancy by Unholy Vault Designs, and select the tube layer. Copy and paste to canvas centered at H200, V350.
Open YBR Frame 01, resize by 75% and place on your canvas, centered at H230, V340. On the layer pallet, click on the tube layer to select it, then use you pick tool to resize the tube to fit inside the frame. You might need to erase a small bit of the pentagram that is showing outside the frame.
Open YBR Paper 02. Select Adjust --> Hue and Saturation --> Hue/Saturation/Lightness. Change your settings to the following: Hue -5, Saturation -15, Lightness -12, then click on okay. Use your selection tool to draw an ellipse on the paper, roughly the save of the frame, then copy and paste to you canvas. Use your pick tool to resize the new paper layer to fit the frame, then, on the layer pallet, drag it behind the tube layer.
On the pallet layer, click on the frame layer to activate it.
Open YBR Pin 02, resize to 75% and add to the canvas centered at H550, V350. Rotate the pin slightly clockwise, and erase a small portion of the pin so that it appears to be stuck through the paper.
Open YBR Doodle 02 and resize to 35%. Copy and paste to the canvas, centered at H350, V550.
Open YBR Beads 01 and resize to 60%. Copy and paste to the canvas centered at V400, H630.
Open YBR Button 01, resize by 50% copy and paste to the canvas centered at H250, V620. Rotate 45% clockwise using your pick tool.
Set your foreground and background color to #c1a852 (which matched the background behind the frame). Select your text tool and using a font of your choice enter the copyright information for the tube. For PSP13062 Necromancy, the copyright information is:
(c) Unholy Vault Designs http://asaenath.deviantart.com
Your License Number
Make sure it's legible and a bit on the larger size, as we will be reducing the image.
Select your tube later and added a drop shadow to the tube. I am using Offset Vertical and Horizontal 10, Opacity 60, Blur 25, and color Black.
Select Image, resize, make sure the "Resize all layers" box is checked and resize to 75% (600 x 600 pxls).
You can now save the artist's copy at a .pspimage.
On the pallet layer, click the eyeball next to the white layer to make it invisible. Select Layers --> Merge --> Merge visible. Using your pick tool, center the image to H300, V300, and then bring make the white layer visible again.
Adding a Name: I am using the Black Epoxy Alpha for this, which is a free alpha. You may choose to add your name in a different manner, which is certainly alright.
The alpha is a full sized one. For the moment, minimize your main canvas and open a new raster canvas, 800 pxls wide, 300 pxls high with a transparent background. You can turn your grid on if you'd like, I just use the little checkerboard pattern on the canvas to line things up.
Open the Black Epoxy Capital letter of choice. Resize to 25%, add to the canvas. Repeat the procedure with each of the lower case letters in the name you are spelling out. If you have double letters - as in the A and N in my name - you need only do this once as you can use duplicate function to replicate them on the canvas.
Using the pick tool, line the letters up on the new canvas to spell out the name you wish to add to the tag. Note that if you have a LONG name, you may need to make the letters a bit smaller to fit them all onto the canvas.
One you have the name composed to taste, select, Layers --> Merge --> Merge Visible. Edit and copy the name and then reactivate your main canvas. Add the name to the canvas, centered at around H400, V430. This may change depending upon how long the name is. Use the pick tool to resize and relocate the name to taste.
Delete the white layer and select Layers --> Merge --> Merge Visible. Save the tag as a .png file and your finished!
I hope you enjoyed this tutorial. If you have any questions or get stuck, please feel free to E-Mail me.