This tutorial was written by Dianna Richards of Digicats (and Dogs). Any resemblance to any other tutorial, published or unpublished, living, dead or undead, is purely coincidental.
Please do not rebroadcast, redistribute or otherwise claim this tutorial or any part there of as your own work.
Items you will need to complete this project:
The Wild Wild West taggers kit by Soxsational Scraps. You may purchase this kit at Sophisti-Scraps.
Western Tube of Choice. I am using Brandy Everett's Ryver Cowgirl. You must have a license to use this tube, which can be obtained at MyPSPTubes.com*.
Wee Scott's Lass mask #348, which can be downloaded HERE. (I think these are supposed to be dragons, but they kind of look like horses, so for the purposes of this tutorial, we will believe that they are horses.)
Optional Western Type Alpha. I am using Rawhide by WenchD Graphix. This was a blog freebie when I obtained it, but is no longer available as she limits her freebies to one weeks duration.
The two fonts I use in this tutorial, Harrington and Harlow Solid Italic are system fonts and should be available on your computer. If not, select a font you like and use that instead.
Note that H# and V# refer to Horizontal and vertical coordinates on your canvas grid. Make sure you have View, Rulers checked in order to see the ruler grid.
When I say "Add to your canvas" I expect that you will copy and paste it as a new layer, unless otherwise state in the tutorial.
This tutorial assumes you have a working knowledge of PSP. It was written using PSP X1, but should work in most other versions of PSP.
To begin, open a new Canvas, 800 pixels x 800 pixels and flood fill white.
Open WWW paper 2, and add to canvas
Open WWW Paper 8. Go to Layers --> Load/Save Mask --> Load Mask from Disk and select Wee Scots Mask # 348. Make sure the "Fit to canvas" box is checked and click on load.
Select Layers --> Merge Visible, then Edit --> Copy Merge and paste onto canvas centered at H400, V400.
Open WWW Wheel and add to canvas centered at H500, V550.
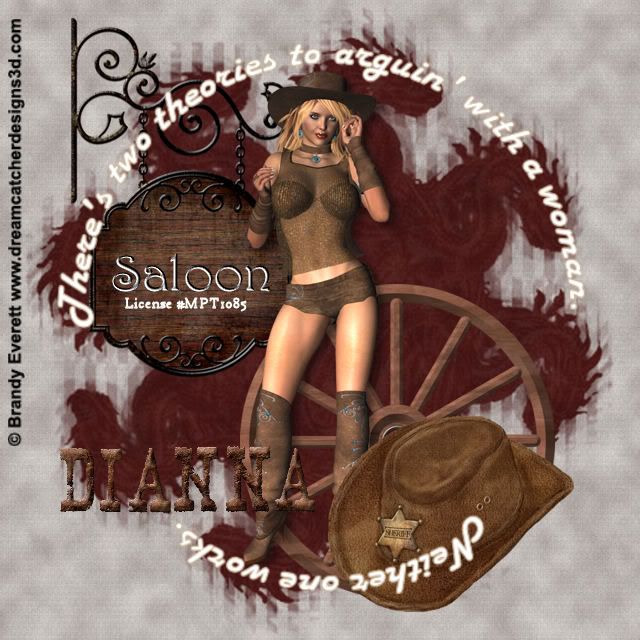
Open WWW Blank Sign 2, and add to canvas centered at H250, V250. In the color pallet, set your foreground color to #C9b093 (stroke), and your background color to #ffffff (fill), then click on the text tool and select the font Harrington, 14 points, bold and center. Click on the center of the BlankSign2, and type the word "Saloon". Select Effects --> Texture Effects --> Emboss.
Select Image --> Resize, and resize the canvas by 80% to 640 x 640 pxls.
Open PSP tube 8384 Ryver Cowgirl. Copy the Tube layer & add to canvas centered at H320, V320.
Open WWW Hat 2 & add to canvas, centered at H450, V510.
Open a new Vector image. Click on your text tool, and change fonts to Harlow Solid Italic, Bold, Center, 8 Points. Starting at V320, H100, type the following:
There's two theories to arguin' with a woman.
On the canvas at V320, H550, type:
Neither one works.
Select preset shape and draw a circle in between the two lines of text. Center it at v320 and v320.
Change to your pick tool, and right click on the circle, select properties, and uncheck the "Visible" box on the dialog screen.
Hold down your shift key and with the now invisible circle still selected, add click on both lines of text to add both lines of text to the selected area.
Select Objects --> Fit Text to Path.
Select Edit --> copy and then return to your main canvas and paste the resulting vector image to your main canvas. You may then dismiss the Vector canvas.
Center the text at V320, H320. On the Pallet menu, right click on Vector 1 and select convert to raster. Use the drag boxes to enlarge the text area until it's surrounding the image.
Add a drop shadow of choice to the tube.
Add the Copyright info and your licensing number wherever you wish, so long as it is visible. You add an optional "Tag by" line. Note that adding the copyright info is NOT optional, it must displayed for you to use this tag online. Then save an artist's copy as a .pspimage.
To add my name, I am using the Rawhide alpha by Wenchd Grafix. You may select an optional alpha of your choice for this part, or simply type your name in using a western style font of choice.
Usually, when I add names using alphas, a do a name plate up in a separate, canvas, merge visible and then copy and paste the name over as one file. Feel free to add your name in whichever manner works best for you.
Select Layers --> Merge Visible. Save the image as a .jpg image and your all ready to post it to the web.
I hope you enjoyed this tutorial. If you have any questions or get stuck, please feel free to E-Mail me.
* It has come to my attention that Brandy Everett is no longer selling at MyPSPTubes.com. I am attempting to discover which licensing agent she is now using.
No comments:
Post a Comment