This tutorial was written by Dianna Richards of Digicats (and Dogs). Any resemblance to any other tutorial, published or unpublished, living, dead or undead, is purely coincidental.
Please do not rebroadcast, redistribute or otherwise claim this tutorial or any part there of as your own work.
Items you will need to complete this project:
Play me a Lullaby taggers' kit by Heartbeatz Creationz. You can purchase this kit at the Heartbeat Creationz Boutique.
Tube of choice. I am using Brandy Everett's "Look of Love" which was purchased and licensed through MyPSPTube.com. Since I purchased the tube, Brandy has left MyPSPTube.com. I do not know where she is licensing her artwork at the current time.
Wee Scot's Lass mask # 52, which you can download HERE.
Gothic font of choice. I am using Chiller, which is a Windows System font.
Optional alpha of choice. I am using "Diamond" which was created by JoBeth.
Note that H# and V# refer to Horizontal and vertical coordinates on your canvas grid. Make sure you have View, Rulers checked in order to see the ruler grid.
When I say "Add to your canvas" I expect that you will copy and paste it as a new layer, unless otherwise state in the tutorial.
This tutorial assumes you have a working knowledge of PSP. It was written using PSP X1, but should work in most other versions of PSP.
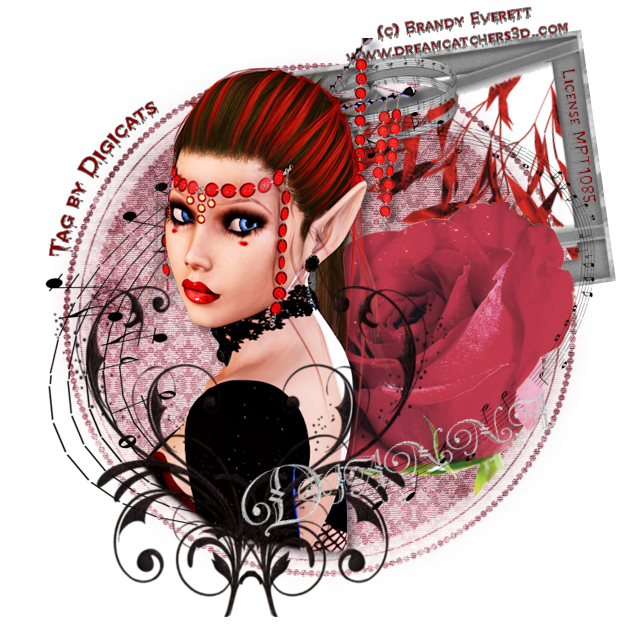
To begin, open a new canvas, 800 x 800, flood fill white.
Open HC_pmal-paper5. Select Layers --$gt; Load/Save Mask --$gt; Load mask from disk and then select Wee Scots Lass Mask #52. Make sure the "Fit to Canvas" box is checked and then hit Load.
Select Layers --$gt; Merge Group. Then select Edit--$gt; Copy --$gt; Paste as new layer. You may now close HC-pmal-paper 5 (do not save it).
Select Image --$gt; Resize. Resize the canvas to 80%.
on the Pallet menu click on the add a new layer (Raster 2) but leave it blank for now.
Open HC_pmal-frame5. Using your magic wand, select and delete the white background areas of the frame.
Resize the frame by 60%, and add to canvas centered at H430, V180.
Open pso12055 SCEverett Look of Love. Select the Tube layer, copy and paste to your canvas, centered at H250, V300.
Using your eraser tool, remove the parts of the tube that fall outside the pink paper area.
Select HC_pmal-Element 40, resize 80% and add to your canvas centered at H250, V450.
On the layers palate, click on Raster 3, which is the frame layer to activate it.
Open HC_pmal-Element 26, re-size 80% and add to your canvas centered at H420, V380. Again, use your eraser tool to remove the part of the stem that fall outside the paper area.
Open HC_pmal-Element 46, resize 85%, and add to canvas. Since Raster 6 (the rose) will still be active, it will fall over the rose layer, but under the tube layer (Raster 4). Center at H320, V320.
Set your foreground color to Gray #808080, and your background color to Deep Red #800000. You can pick these directly off the color pallet boxes on the Material Properties pallet.
On the Layer Pallet, click on Raster 2 to activate. Open HC_pmal-Element 10, resize by 80% and add to canvas, centered at H440, V210. Use your eraser tool to remove anything that shows outside the frame.
Click on your text took and select Gothic font of choice. (I am using Chiller.) Font size with depend on font choice. Also select Bold, and Center.
On the Canvas, click over the frame and add the copyright information. Adjust and locate to taste. You can also add your "tag by" line at this time if you wish. Location is up to you, but leave the lower right hand corner of the tag open, as that is where we'll add the name.
Note that you must use your own licensing number when you add the copyright info, and it should be clearly visible along with the artists name in order to be compliant with the licensing agreement.
Add a drop shadow of choice to the tube layer.
Save the artist's copy as a .pspimage at this time.
You can either use an alpha to add your name or you can type it in using a suitable font. I am using the Diamond Alpha which is a full sized alpha that I have scripted down to use in tagging.
Usually, when I add names using alphas, a do a name plate up in a separate canvas, merge visible and then copy and paste the name over as one file. Feel free to add your name in whichever manner works best for you.
Select Layers --> Merge Visible. Save the image as a .jpg image and you're all ready to post it to the web.
I hope you enjoyed this tutorial. If you have any questions or get stuck, please feel free to E-Mail me.
No comments:
Post a Comment