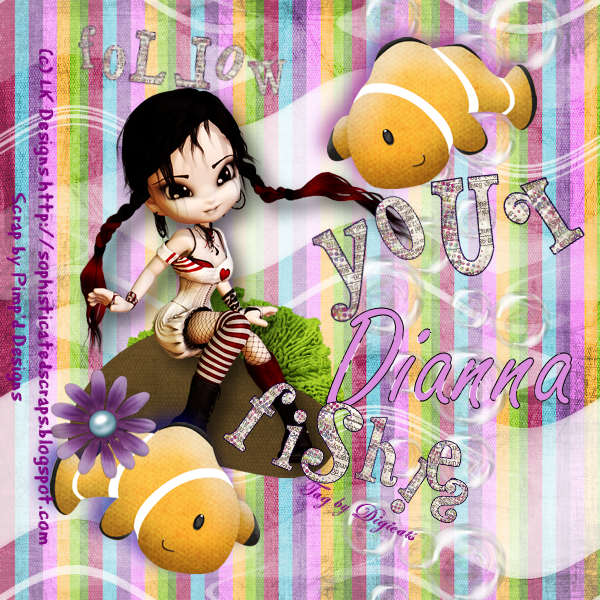
This tutorial was written by Dianna Richards of Digicats (and Dogs). Any resemblance to any other tutorial, published or unpublished, living, dead or undead, is purely coincidental.
Please do not rebroadcast, redistribute or otherwise claim this tutorial or any part there of as your own work.
Items you will need to complete this project:
The Mermaid-topia taggers kit by Pimp'd Designz. This kit is available for purchase at Sophisti-Scraps.
Delerium #1 by Sophisticated Scraps and Imaging. This is a free to use tube which you can download HERE.
Cameron's Oceans 5 Mask, which you can download HERE.
Font of choice.
The Frazzled Mess alpha by Lady Grundlefunk. This is a full sized alpha that I resized for tagging. It is also free and available from Disasterpiece Studios.
Note that H# and V# refer to Horizontal and vertical coordinates on your canvas grid. Make sure you have View, Rulers checked in order to see the ruler grid.
When I say "Add to your canvas" I expect that you will copy and paste it as a new layer, unless otherwise state in the tutorial.
This tutorial assumes you have a working knowledge of PSP. It was written using PSP X1, but should work in PSP 8 and up.
To begin, open a new raster layer canvas, 600 x 600 pxls, flood fill white.
Open Mermaid-topia pp2. Go to Layers --> Load/Save Mask --> Load Mask From Disk and find Cameron's Ocean 5 Mask. Make sure the Fit to Canvas box is checked as well as the "Invert Transparency" box. Then click on load.
Layers --> Merge --> Merge Group, then add to your main canvas, centered.
Open Bubble cluster, and add to your canvas, centered at H450, V300.
Open Sea Foam, resize to 50% and add to canvas centered at H250, V 350.
Open Rock, Resize to 60% and add to canvas, centered at H200, V400.
Open SSLisa Delirium 1. Erase Lisa's sig, then resize to 65% and add to canvas, centered at H250, V280.
Open Fish 1, resize to 75% and add to canvas, centered at H430, V110.
Duplicate and mirror the layer, then relocated the duplicated fish to H150, V500.
Open a new canvas, 600 x 600 pxls, with a transparent background. Using the frazzled mess alpha, spell out the words "Follow" "your" and "fishies". Use a combination of upper and lower case at random and resize and rotate to the letters to give the words a chaotic look. Delirium is, by nature, a very chaotic personality, so try to make the words reflect that.
Once you have composed the words you'll need, select layers --> merge --> merge visible, then use you selection tool to grab each word as a whole to paste to main canvas. "Follow" should be up around H180, V60. Use your pick tool to resize to taste. "Your" should be centered around H450, V250. I put a counter clockwise tilt to it to match the fish. "Fishies" is centered at H350, V450, with a clockwise tilt to it.
Open flower-1, resize to 25% and add to your canvas, centered at H100, V420.
Add a drop shadow to your tube and to the two fishies. In this case, mixing the shadows and changing the colors is fine. The tag is supposed to have a chaotic feel to it.
For the tube later I used Offsets H & V of 10, Opacity 60, blur 25, color black. For the top fishie, I switched the offsets to -7 each and the color to dark purple (#800080). For the bottom fishie I kept the V offset at -7, but changed the horizontal offset to -10, and the background color to dark blue (#000080).
Along the left hand side of the tag, using the font of your choice, add the copyright information to the tag. In this case:
(c) LK Designs http://sophisticatedscraps.blogspot.com
Scrap by Pimp'd Designs
I am using the Eraser Dust font, and dark purple (#800080), 6 points, bold, centered. You can also add your "tag by" info at this point if you wish.
You can then save your artist's copy as a .pspimage at this point.
To add the name, I used the "Freestyle Script" Font set to 36 points, Bold and centered. I used a black glitter stroke and set the fill color to light purple (#dc8cdc), which is the color on the background paper we used. It should be centered somewhere around H4to, and V375, depending upon the size of the name being used.
Once you've added your name, you can drop the white background, merge visible, and save as a .png - or you can leave the white background, merge visible, and save as a .jpg (your choice).
That's it! I hope you enjoyed this tutorial. If you should have a problem, please feel free to E-Mail Me and I'll be happy to help you out.
No comments:
Post a Comment