This tutorial was written by Dianna Richards of Digicats (and Dogs). Any resemblance to any other tutorial, published or unpublished, living, dead or undead, is purely coincidental.
Please do not rebroadcast, redistribute or otherwise claim this tutorial or any part there of as your own work.
Items you will need to complete this project:
Little Miss Princess taggers kit by Chili Designz. You can find this kit at Exquisite Scraps Shop.
Tube of your choice. I am using Joseph Corsentino's Play with Me tube, PSP11078, which is a free to use tube available at MyPSPTubes.com. Note that you MUST have a license to use this tube, which can be obtained at MyPSPTubes.com.
Optional Alpha of your choice. I am using the Guinevere Alpha by Sarah Grimwood.
Note that H# and V# refer to Horizontal and vertical coordinates on your canvas grid. Make sure you have View, Rulers checked in order to see the ruler grid.
When I say "Add to your canvas" I expect that you will copy and paste it as a new layer, unless otherwise state in the tutorial.
This tutorial assumes you have a working knowledge of PSP. It was written using PSP X1, but should work in most other versions of PSP.
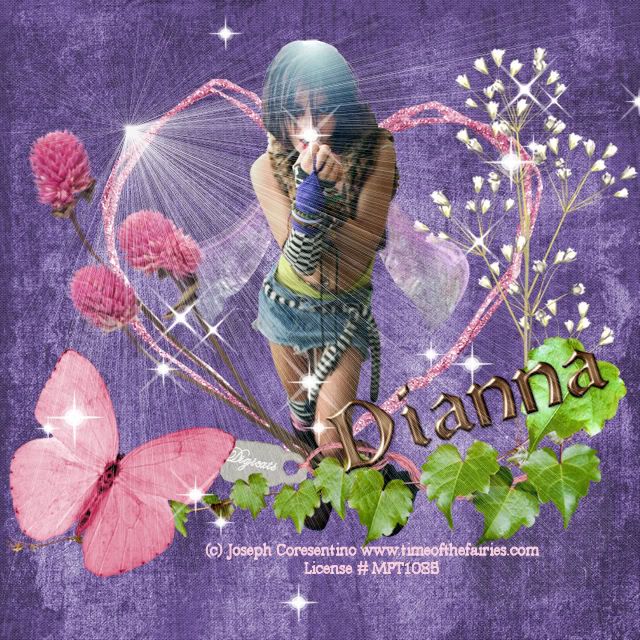
To begin, open a new canvas, 800 x 800 pxls, floodfill white.
Open Chili Designz, Little Miss Princess Paper 9 and add to canvas.
Open Frame element and add to canvas, centered at H400, V350.
Open the ivy element. Resize 89%, Copy and paste as a new layer, centered at H400, V560.
Activating the frame layer on you layer pallet, open the plant element and then copy and paste as a new layer to your canvas, centered at H660, V350. This will effective place it behind the ivy element.
Resize canvas 80%.
Open Joe Corsentino's Play with Me tube (psp11078). This is a free to use tube, but you must have a license to use it.
Select the Tube Transparent layer and copy and paste as a new layer to your canvas, centered at H320, V290.
Returning to the Chili Designz kit, open the flower element, resize 80% and add to your canvas, centered at H170, V300. Rotate slightly so that the stems of the flower line up with side of the frame.
On your layer pallet, activate the top layer (it should be Raster 3, the layer with the Ivy on it). Open the butterfly element and mirror. Copy and paste to your canvas as a new layer, centered at H120, V470.
If desired, open the tag element, Rotate Right, and using a font of your choice, enter your tagged by information. Select Layers, Merge, Merge visible.
Add to your canvas, centered at H400, V470. Now, drag the layer below the Ivy layer. The tag info should show up just to the right of the butterfly and the string should blend in with the Ivy leaves.
Open the Sparkles element and add to your canvas. Don't resize. Center at H320, V320. This should put one of the lights right at the tip of the Fae's fingers. If it doesn't adjust until it does.
Using a font of your choice and add the licensing information to the tag, directly under the Ivy line:
License #
My info is centered at H370, V560. Make sure you add your MPT license number!
You can now save the artist's copy as a .pspimage file, but you're not done yet.
With the butterfly layer (raster 7) selected, using a font of your choice or an alpha of your choice, add your name to the tag. I am using the Guinevere Alpha by Sarah Grimwood which is a full sized alpha at I resized by 35% and assembled as a name plate in an outside canvas. I then merged it down to one file and added the name, whole to my tag. I also usually save the finished name plate to the directory with the alpha in it, so that I will have it to use again.
Once you've added the name, you will want to select Layers, Merge, Merge Visible.
Select Effect, Illumination effects, Sunburst. Use the drop down box on settings and to select Rays Upper Left.
The rest of the factory defaults should work. see the screen shot below for details.

You're now finished! Yeah! Save the completed file as a .jpg. You might wish to resize it by 85% for use on forums and the like.
No comments:
Post a Comment