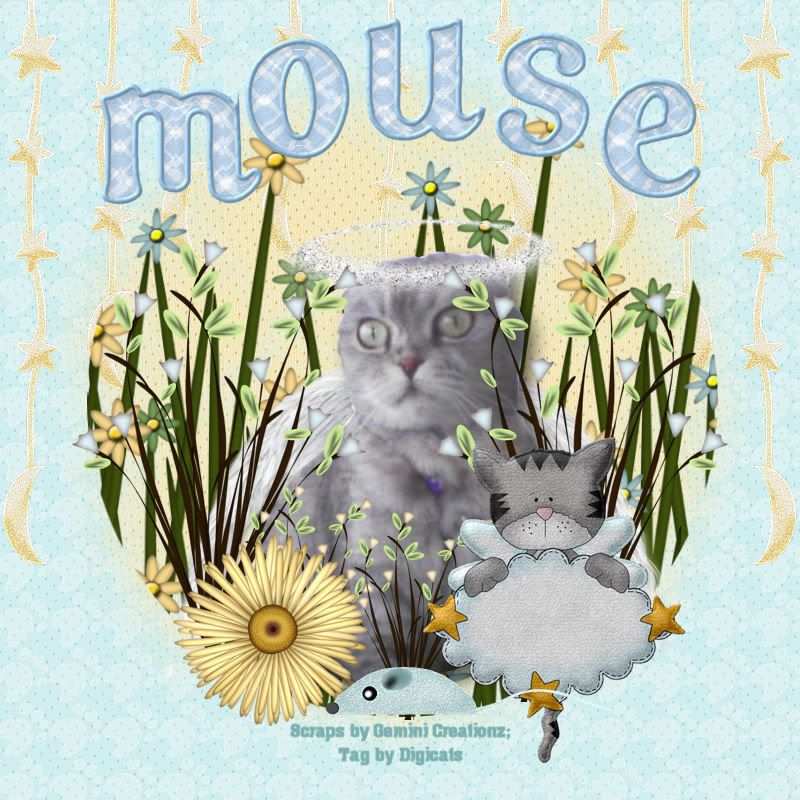
This tutorial creates a Memorial Tag for a beloved pet who has passed over the Rainbow Bridge. For the purposes of this tutorial, I am using my friend's cat, Mouse, who was a beautiful Scottish Fold.
This tutorial was written by Dianna Richards of Digicats (and Dogs). Any resemblance to any other tutorial, published or unpublished, living, dead or undead, is purely coincidental.
Please do not rebroadcast, redistribute or otherwise claim this tutorial or any part there of as your own work.
Items you will need to complete this project:
The Chloe's Angel taggers kit from Gemini Creationz. This kit may be purchased at Sophisti-Scraps.
Tube of your choice. I have extracted a picture of Mouse from a photograph provided by my friend. It is beyond the scope of this tutorial to teach you to do extractions. If you do not know how to create tubes, various designers offer tubing services online.
Mask # 119 by Wee Scots Lass. You may download this mask for free HERE.
Optional Angel Element pack by Digital Delights to provide wings and halo. Patty wanted me to put wings on Mouse, and I offered to add the halo as well. This pack is available at Scrappetizing.
Pastel Blue Alpha by Crazed's Creations which may be download for free from her blog.
Note that H# and V# refer to Horizontal and vertical coordinates on your canvas grid. Make sure you have View, Rulers checked in order to see the ruler grid.
When I say "Add to your canvas" I expect that you will copy and paste it as a new layer, unless otherwise state in the tutorial.
This tutorial assumes you have a working knowledge of PSP. It was written using PSP X1, but should work in most other versions of PSP.
To begin, open a new canvas 800 x 800 pxls, flood filled white.
Open CA-Paper 9 and add to canvas
Open CA-Paper 6. Select Layers, Load/Save Mask --> Load from Disk and find Wee Scots Lass mask #119. Make sure the "Fit to Canvas" box is checked and then click on load.
Select layers, merge, merge group. Copy and paste the masked CA-Paper 6 to the canvas.
Open CA-Star Curtain and add to canvas, centered at H400, V280.
Open CA-Grass. Using your selection tool set to circular, start at H550, V400 and draw a circle in the grass extending to either vertical side. Copy and paste the selection to your canvas and use your pick tool to resize it to it in the circular area of CA Paper-6.
Add your tube. placement is going to depend on the side of the tube, but initially it should be centered. You can then use to pick tool to adjust as needed.
If you're going to add the optional wings and halo, now is the time to do so. As the Digital Delight pack is in full size, you will need to resize it down. In the example tag above, I resized the wings down to 25% to fit Mouse and the Halo I had to adjust further using the pick tool as 25% was still too big.
Once you have added wings and Halo, erase any part of the wings that hangs outside the circle created by CA-Paper 6.
Returning to the Chloe's Angel kit, open CA-Grass 2 and resize by 50%, Add to the canvas centered at H220, V450. Duplicate, then mirror.
Open CA-Grass 3. Resize to 25% and copy. Place three copies, evenly spaced down along the front of the circle, between the two grasses 2.
Open CA-Flower 1, resize 50%, and add to canvas centered at H270, V630.
Open CA-PNG 5, resize by 50%, and add to the canvas centered at V550, H600.
Open CA-Mouse 2, and add to the canvas centered at V470, H690.
Under the circular area where most of the composition is done, you may put your "Scraps by", and "tagged by" information at this time. You still need to add the name. However, once you've added the information in this section, save the tag as an artists copy in .pspimage format. You might also wish to add a drop shadow to your tube at this point.
Adding the Alpha: I am using the Pastel Blue Alpha by Crazed Creations. It is tagger sized and as I used only lower case letters I did not have to resize. Try to center as best as possible. In this case, because there is a "M" to start the name, the "U" has to be moved over from dead center to compensate.
It you are using a longer name, you will likely have to resize the letters to make the name fit. You can do this using the Image --> resize function or by using the pick tool once you have added them to the canvas. Which every way works best for you, use it!
Once you have finished with the name, go to Layers --> Merge --> Merge Visible and save as a .jpg file, and your all done! You now have a tag to post on your blog or website commemorating your beloved fur-baby!
I hope you enjoyed this tutorial. If you have any questions or get stuck, please feel free to E-Mail me.
No comments:
Post a Comment