This tutorial was written by Dianna Richards of Digicats (and Dogs). Any resemblance to any other tutorial, published or unpublished, living, dead or undead, is purely coincidental.
Please do not rebroadcast, redistribute or otherwise claim this tutorial or any part there of as your own work.
Items you will need to complete this project:
The Sailboats taggers kit from Bits'N'Bobs. This kit is currently free to use (through 30 June 2009) and is part of the June Goodie Train.
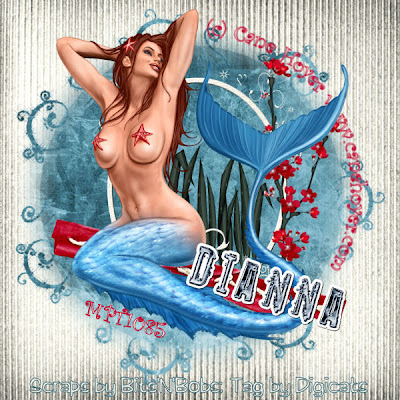
Tube of Choice. I am using PSP4805 Siren by Cane Hoyer. You must have a license to use this tube, which may be obtained at www.mypsptubes.com.
Wee Scot's Lass Mask #339 which may be downloaded HERE.
Optional Sticker Alpha from Bits'N'Bobs. This is a blog freebie and is available HERE.
Font of Choice. I am using Curlz MT, which can be downloaded HERE.
Note that H# and V# refer to Horizontal and vertical coordinates on your canvas grid. Make sure you have View, Rulers checked in order to see the ruler grid.
When I say "Add to your canvas" I expect that you will copy and paste it as a new layer, unless otherwise state in the tutorial.
This tutorial assumes you have a working knowledge of PSP. It was written using PSP X1, but should work in most other versions of PSP.
To begin, open a new canvas, 800 x 800 pxls, flood fill white.
Open Paper 3, resize to 89%, and add to canvas
Open Paper 3, resize to 89%. Layers --> Load/Save Mask --> Load Mask from Disk. Select WSL #339. Make sure the "Fit to Canvas" box is checked and hit load.
Got to Layers --> Merge --> Merge Group. Copy and paste to the canvas as a new layer.
Open Frame #4 and add to main canvas. Center at H400, V370.
Open Cherry Blossom 2, and add to canvas, center at H570, V370. Using you pick tool, rotate slightly to the right.'
Resize the canvas to 75% (600 x 600 Pxls).
Open PSP4805, Siren. Copy the Siren layer and add to the main canvas as H300, V260. Open the Star Bra layer and add to canvas, position appropriately. Repeat with the star hair layer.
Open the Tail Version layer of PSP4805, Siren, copy and add to main canvas. Position appropriately.
Select Layers, Merge --> Merge down and Merge the tail layer with the star bra layer. Repeat with the Star Hair layer, and then repeat to merge to the tube.
Open the grass element and using your selection tool, move the grasses - except for the cat tail - over to the main canvas. Use your pick tool to position and resize them taste around the mermaid. Use as many blades of grass as you need to make you happy and get the desired effect.
On the layers pallet, right click on the frame layer in in the pop up menu, select Arrange - bring to top. Repeat with the Cherry Blossom and the Mermaid, in that order.
Open Scrap 2 and resize by 50%. Click on the blossom layer to activate it, then copy and paste Scrap 2 to the canvas. Center at H300, V4200. Using your pick tool, Rotate clockwise approximately 30%.
Open a new Vector image, 600 x 600 pxl (transparent background). Select the Curlz MT font, 8 points, bold, center.
On the Material's pallet, set your foreground color to Red (#c41236) and the background color to eggshell white (#edebdf). Using the text tool, click on the vector canvas at 300h, 100v and type the copyright info:
(c) Cane Hoyer www.canehoyer.com
Use your preset shape tool to draw a circle under the text. Activate your pick tool, and right click anywhere on the line of the circle. Select Properties from the pop up menu and then unclick the visible box and say OK.
Holding down your shift key, click on the copyright text to add it to the selection area with the now invisible circle.
Select Objects, and fit text to path. Copy the copyright info and paste it to main canvas. This will paste the text as a new Vector layer.
Right click on the vector layer and select Convert to Raster Layer on the pop up menu. Use your pick tool to reposition the text around the outside of the blue masked area. (See example above.) Try to keep as much of it visible as possible.
You can then dismiss the working vector canvas as we're done with it.
Using your text tool and the same settings as above, click at H200, V500 on the canvas and add your license # to the canvas. Rotate slightly to match the angle of the mermaid's tail.
If you desire, change the foreground color on your Materials Pallet to #346372. Change to a font of your choice (I am using Clarence) and add your "tagged by" information to the tag.
Save the artist's copy as a .pspimage.
Using the optional Sticker Alpha, add your name (or the desired name to the tag). Select Layers --> Merge --> and Merge Visible and then save as a .jpg file.
If you do not wish to use the Sticker Alpha, you may add your name in any manner you prefer.
I hope you enjoyed this tutorial. If you have any questions or get stuck, please feel free to E-Mail me.
No comments:
Post a Comment